이러한 애니메이션을 만들어야 하는 업무를 받게 되어
UIBezierPath 및 CAShapeLayer, CABasicAnimation, CAKeyframeAnimation를 알아보게 되었습니다.
UIBezierPath
베지어경로

"custom view에서 만들 수 있는 직선 및 곡선 세그먼트로 구성된 경로"라고 나옵니다.
그럼 내용에서 나온것 처럼 customView에 직선을 그리는 소스를 넣어 볼까요?
class View1: UIView {
    override func draw(_ rect: CGRect) {
        let path = UIBezierPath()
        UIColor.systemRed.set()
        path.move(to: CGPoint(x: 10, y: 10))
        path.addLine(to: CGPoint(x: 30, y: 100))
        path.addLine(to: CGPoint(x: 40, y: 50))
        path.close()
        path.lineWidth = 5
        path.stroke()
    }
}
addLine을 단순히 2번만 했는데 원점과 이어진 모양이 보이시죠??
이것은 마지막에 close()을 해주었기 때문입니다.
- close()메서드를 호출하면 현재 지점에서 하위 경로의 첫 번째 지점까지 직선 세그먼트를 추가하여 하위 경로를 닫습니다.
- move(to:)메서드를 호출하면 현재 하위 경로가 종료되고 (닫지 않고) 다음 하위 경로의 시작 지점이 설정됩니다.
// 위의 소스 그대로
path.close() //이 소스 주석 한 경우
이렇게 단순한 직선을 그릴 수도 있으며
path.lineCapStyle = .round
path.lineJoinStyle = .round
이러한 옵션을 추가하여 둥글게 할 수도

let pattern: [CGFloat] = [6,4]
path.setLineDash(pattern, count: pattern.count, phase: 0)
이러한 옵션을 넣어 점선을 만들 수도 있습니다.

직선말고 도형도 만들어 볼까요??
class View2: UIView {
    override func draw(_ rect: CGRect) {
        let path = UIBezierPath()

        path.move(to: CGPoint(x: self.frame.width/2, y: 30))
        path.addLine(to: CGPoint(x: self.frame.width/2 - sqrt(2700), y: 120))
        path.addLine(to: CGPoint(x: self.frame.width/2 + sqrt(2700), y: 120))
        path.close()

        UIColor.black.set()
        path.stroke()

        UIColor.yellow.set()
        path.fill()

        // 원 그리는법 1
        let circlePath = UIBezierPath(roundedRect: CGRect(origin: CGPoint(x: self.frame.width/2-30, y: 60), size: CGSize(width: 60, height: 60)), cornerRadius: 30)
        UIColor.black.set()
        circlePath.stroke()
        UIColor.green.setFill()
        circlePath.fill()

        // 원 그리는법 2
//        let circlePath = UIBezierPath(arcCenter: CGPoint(x: self.frame.width/2, y: 90), radius: 30, startAngle: 0, endAngle: (135 * .pi) / 180, clockwise: true)
//        UIColor.black.set()
//        circlePath.stroke()
    }
}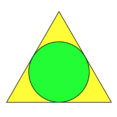
이렇게 그려보았습니다.
처음에 받았다고 했던 과제는 애니메이션이 들어가 있죠??
이 애니메이션하는 방법은 다음 포스팅에서 알아보겠습니다.
'iOS 프로그래밍 > 새로 배운 내용 정리' 카테고리의 다른 글
| [swift] CAShapeLayer / CABasicAnimation / CAKeyframeAnimation (2) | 2020.08.21 |
|---|---|
| Reactive 문서보는 법(rxswift 와 mvvm 도전기2) (0) | 2020.07.31 |
| rxswift 와 mvvm 도전기1 (0) | 2020.07.31 |


